

How To Paint Winter Scenes Acrylic
Snow.
It can seem a tricky subject area to capture.
Is it white? Is it bluish? How practise you paint it to wait soft, or darken it without it looking dull?
Having a 'less is more than' approach to your palette can reflect the colours of Winter absolutely perfectly – without getting complicated.
And the first clue to a convincing Wintertime snowscape, is the heaven…
Observing the light quality of the sky
Successful landscape painting in whatever season requires observation of the light.
Is it strong and vivid or soft and diffused?
Dissimilar light will change the color saturation, shadows and mood of a scene, and so assessing the lighting qualities of the sky is of import to guide your option of pigments and brushstrokes.
So what are yous looking for in your bailiwick?
- What Season is it?
- How loftier or low is the dominicus in the sky?
- What time of day is it?
- Is there deject cover or a clear blue heaven?
- Is there fog or mist creating a haze?
A step-by-step Winter Landscape Painting in Acrylic
Video Tutorial – Part 1
Video Tutorial – Part 2
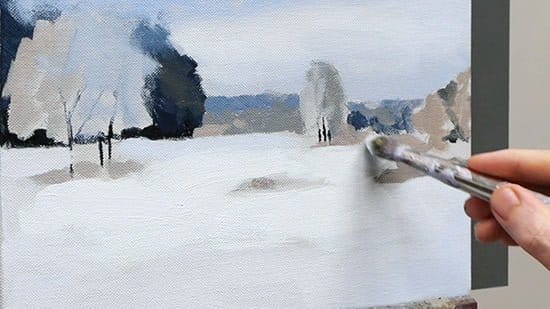
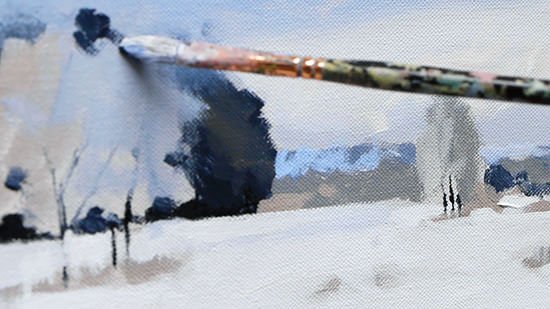
Winter Morning
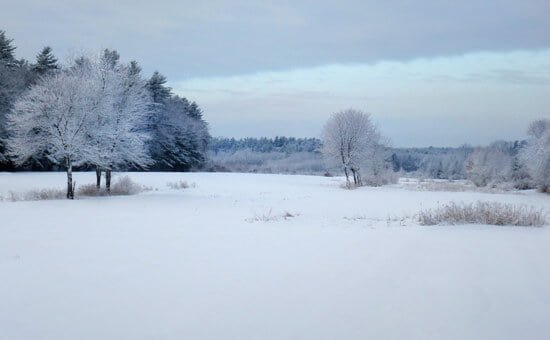
Photo Credit: "Winter Morning time" by Liz West Licensed under CC By 2.0.
In our Winter scene above, the primary low-cal coming from the sky is diffused behind thick clouds with a depression-level glow of the dominicus peaking through, giving us a compressed tonal range, muted colours and shadows on the ground or in the snow that are soft, with diffused composite edges.
The softer the light source, the softer the edges, these are all key elements that make a Winter scene appear magical.
- Wearisome and soft light – muted colours, narrow or compressed tonal range, less contrast.
- Bright and hard light – saturated colours, wider tonal range, more contrast usually Summer which has a wide tonal range with high saturation.
Tonal value & range in a winter scene
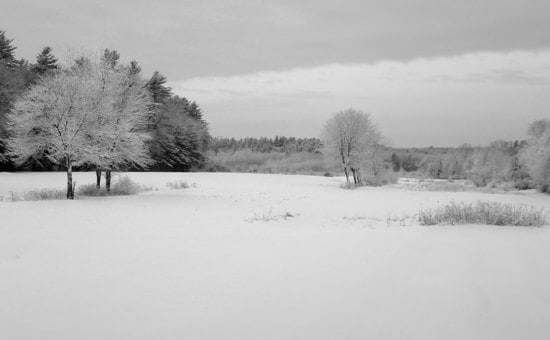
When I'g painting landscapes, I'm essentially looking for ranges of light and night and assessing the values in the scene by middle.
The easiest way to come across this when y'all're first starting is to turn your image into black and white.
This creates what can exist called a 'tonal map', 'value map' or 'tonal range' only the main affair to remember is how wide or compressed that range is, equally it will influence how light or how nighttime you can go with your pigments.

Tones of black and white appear on a 'tonal value calibration' that goes from lite to nighttime
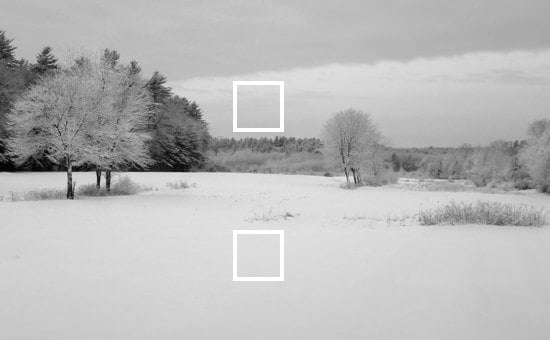
In our reference image higher up, you can see how close in value the sky is to the value of the snow.
 It can exist misleading to our perceptions considering when you call back of snow, you unremarkably call up of white and apart from the very darkest areas on the left of the prototype, the majority of the tones are within ii -3 value steps.
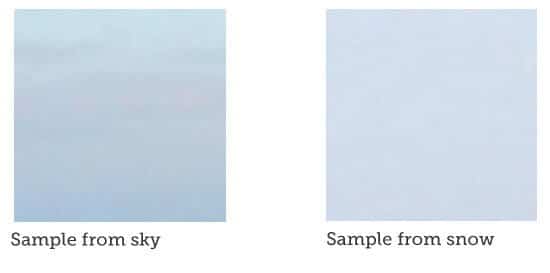 So we have a compressed value range in the least saturated flavor.
I'll be using a very limited palette to produce cute pastel colours and mixing colour strings for subtle shifts in tone for the painting.
Using a limited palette & colour strings
So for this written report, nosotros'll begin with a warm and absurd palette from the bluish and orangish family, alongside pre-mixed grey neutrals.
I wanted to go along this tutorial simple and impressionistic, working within the discipline of Burnt umber and Ultramarine blue to capture the essence of the scene.
If you get into the practice of pre-mixing color (or tonal) strings and and so but use those colours, it volition give y'all a much more compelling movie. Now you take to realise that this volition all come up together when the flick is complete – the urge to add together darker or lighter paint to the compressed range or brighter saturated new colours to the mix volition be hard to resist!
Downloading the reference photo
The photo beneath can exist 'right clicked' and 'Relieve image as', so you tin use it as a reference epitome, print it out and follow along with the video above.
Photo Credit: "Wintertime Forenoon" by Liz West Licensed under CC BY 2.0. Please Note: The Original photograph has been cropped down to the Golden Ratio proportion used in the painting.
You lot can also download a High-Resolution Prototype here...
Materials you will need:
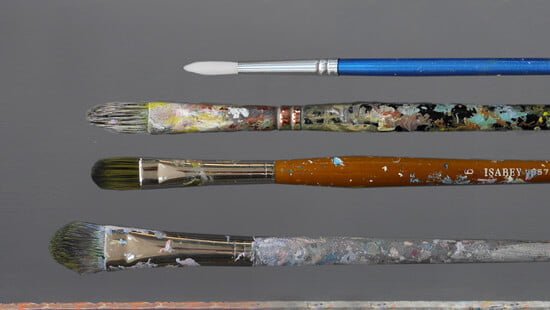
Brushes
- two-inch Purdy decorators brush – Twoscore Monarch Elite
- Small nylon round brush – This castor didn't have a brand name or specific size on the brush, whatever small circular volition be fine. The dimensions are approx iii-5mm in diameter and 1.5 – 2cm in length
- Jacksons Fine art Blackness Sus scrofa Bristle Castor,Size 4 – Series 335
- Isabey Isacryl Acrylic Castor, Filbert shape, Size 6 – Serial 6572
- Isabey Isacryl Acrylic Brush, Filbert shape, Size 10 – Series 6572
Palette knife
- RGM Classic Line, Medium size 45, Diamond shaped, cranked (angled) handle. I use an RGM 45 for mixing the paint on the painting and a larger sized square palette knife (RGM 81) for mixing the coloured footing. Yous don't need the RGM 81 but the larger the palette knife the quicker you can mix larger amounts of colours.
Support
- Jacksons Art (UK) 10 oz cotton duck canvas 20 x 32.4cm (Code: CJS2032) that has 2 coats of white acrylic gesso applied.
I demonstrate on a 10 oz cotton duck canvas, 19mm Profile and the ratio I utilise for the chief paintings are based on the Aureate ratio
An alternative make in the US is Masterpiece Fibonacci Gold Rectangle Canvas
Other materials
- Kitchen roll/paper towel
- Clean water
- Tear-off palette or stay-wet palette (I demonstrate on an A3 size tear-off palette)
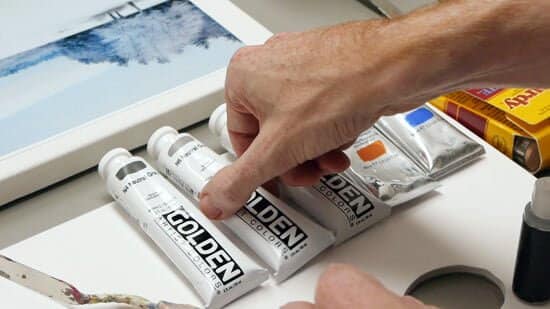
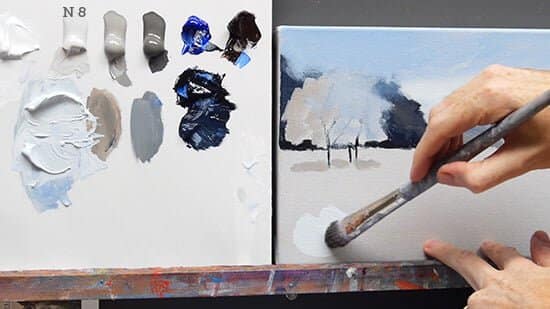
Paints – The colour palette
Artist quality acrylic colours. I've used a mix of Aureate Heavy Body colours & Winsor & Newton Professional Acrylic (likewise chosen Artist Acrylic)
The first colours are a selection of Neutral Grey (Gray) tones.
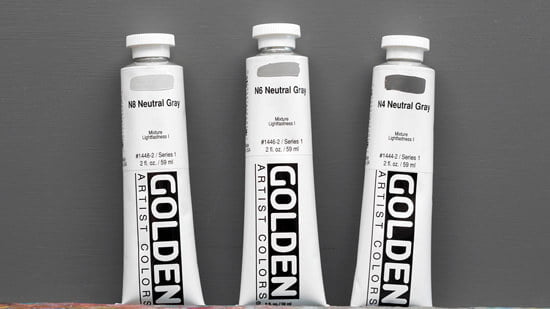
- Neutral Gray N8
- Neutral Gray N6
- Neutral Gray N4
Pro tip: If you don't have access to these neutrals yous can mix your ain neutral with a Burnt umber, Ultramarine blue and Titanium white.
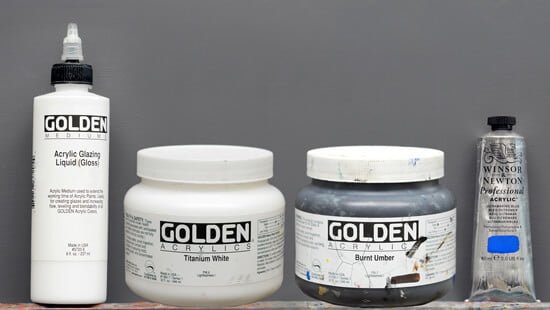
- Titanium white
- Ultramarine blueish
- Burnt Umber
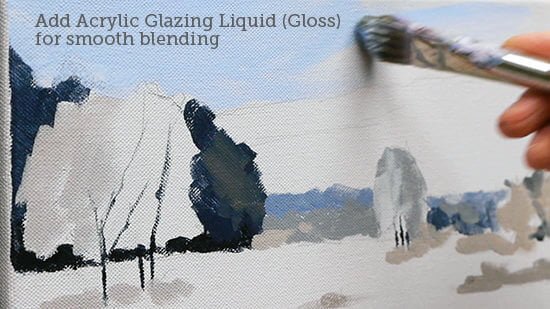
Mediums
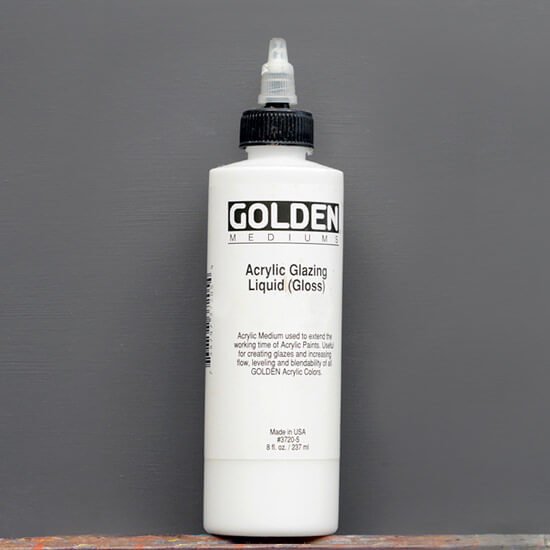
Acrylic Glazing Liquid ( Gloss) Aureate Paints. This will extend the working time of the pigment and enable thin applications of the pigment with smooth smokey blending. What I like near Glazing Liquid Gloss as a medium, is you can utilize information technology in whatsoever ratio in with your paint and information technology still brushes well and remains a prissy paint film integrity.
Stride i. – Choosing a coloured basis
For the ground color, I wanted to knock back the white of the sheet merely not add together likewise much variety in colour so I went for the Neutral 8 Gray.
Step two. – Mix a fluid consistency

To prepare the pigment consistency for the footing colour, clasp out some of the paint and so split the mass of the paint in half.
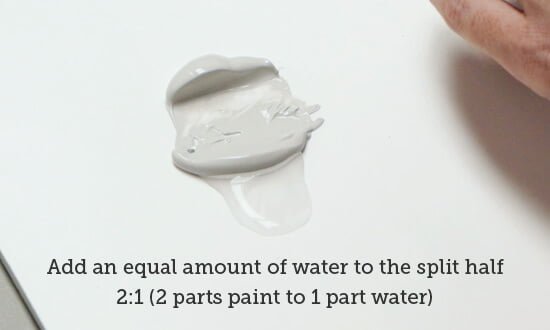
Then add equal amounts of h2o to 1 part of the separate half.
Then you will have ii parts paints: 1 role h2o, diluting the paint by 50%.
Pro tip: You can dilute heavy body paints with h2o and still remain good paint film integrity. This is from Sarah Sands,Technical Services Supervisor for Gilded Creative person Colour.
"Heavy Body acrylics can easily be thinned up to one role paint to ane part water, or a 1:1 ratio, and maintain excellent adhesion onto absorbent surfaces. In fact, fifty-fifty when testing this on a non-absorbent material like Plexiglas, the paints all the same formed adept films with no adhesion failures afterward beingness immune to fully cure.
To add together even a little more comfort beyond that, we can share that the adhesion onto Plexiglas remained solid even when thinning with i part pigment to two parts h2o, or a 1:2 ratio. Which would experience like a fairly fluid wash for most people."
You can read more almost preparing a back up and dilution levels hither

And so mix the first half together well with the water.
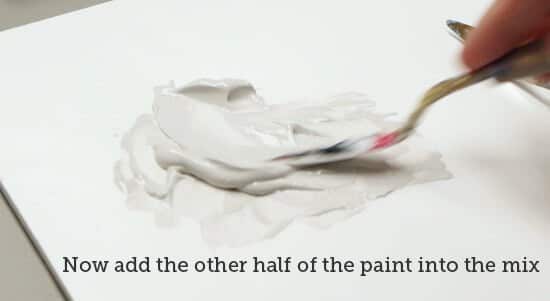
Once the water has been incorporated into a polish mix, combine the rest of the paint and so you have a fluid mix.
Pace 3. – Pigment the coloured ground
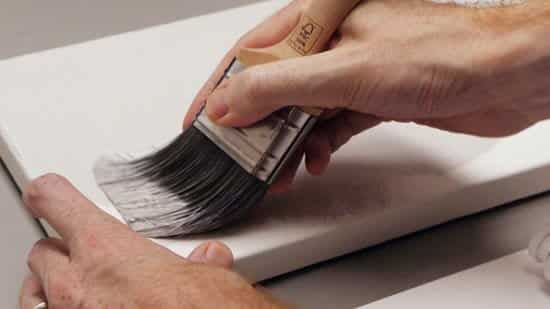
Using a 2-inch decorators brush, push the paint into the canvass weave.
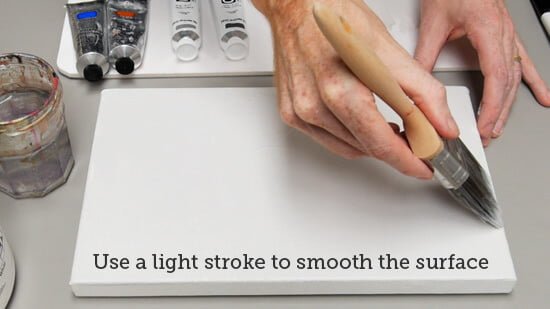
And so use light strokes over the surface to create a shine, even tone.
Step 4. – Drawing Out
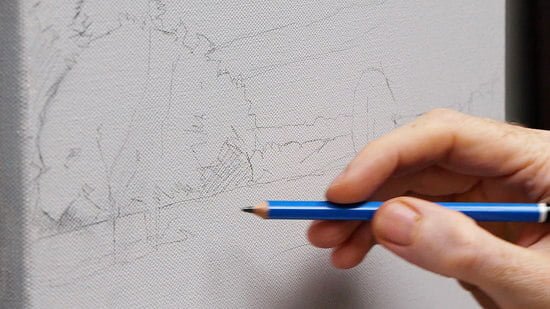
I draw out the basic shapes of the limerick using a 3B pencil (Staedler Mars Lumograph). The main shapes I'm looking for are the circular shapes of the copse on the left and then the shape of the tree in the middle that breaks through the horizontal.
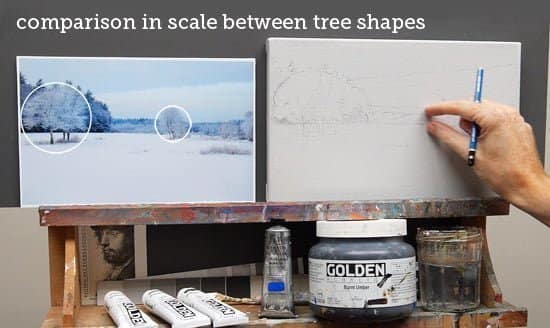
The middle tree shape is about one-half the size of the principal tree on the left.
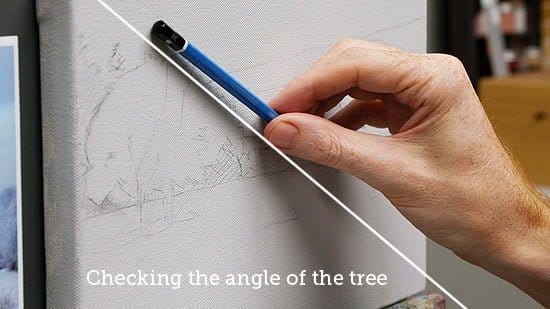
Then check the angle of the tree that brings your eye into the centre of the picture every bit this will assistance to guide the viewers centre into the far distance. I've besides indicated where the night areas of the painting will be past hatching with the pencil.
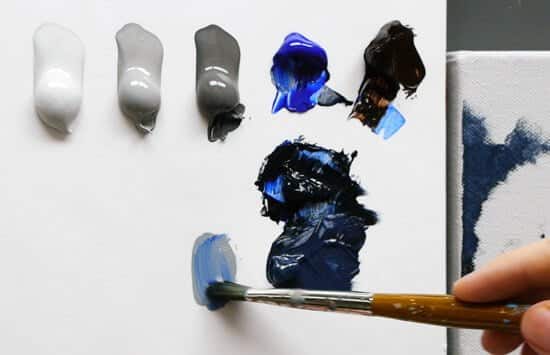
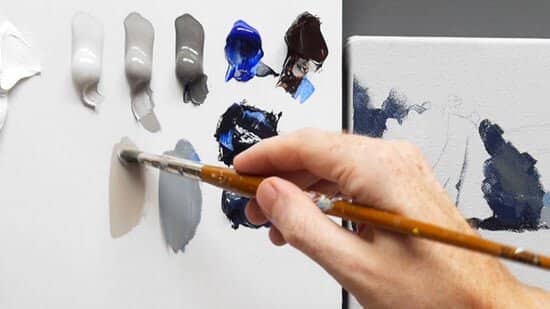
Footstep 5. – Setting out the paints
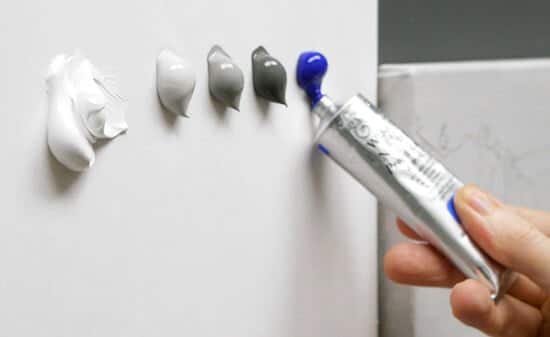
I prepare out the paints in a tonal range from white, lightest grey, heart, grey, dark grey through to the darkest tone.
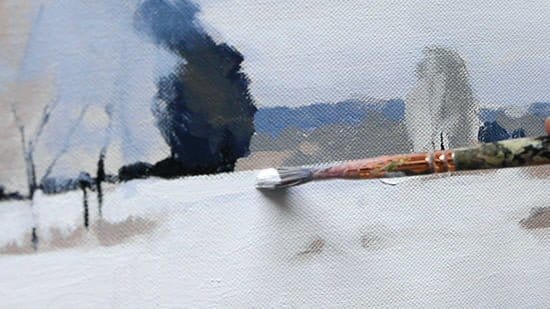
Step 6. – Painting in the darkest tones

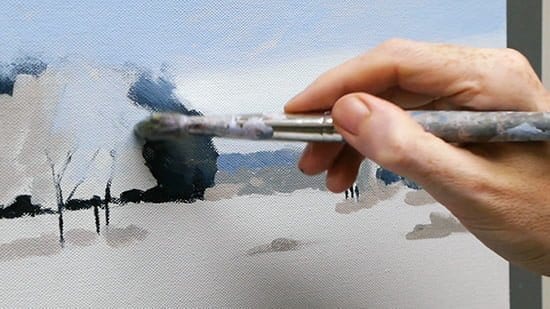
I mix a night blue/blackness from the Burnt Umber and Ultramarine Blue. Using the small nylon round castor I pigment in the darkest areas of the painting. Yous can vary the intensity slightly by adding a touch of water to the mix.
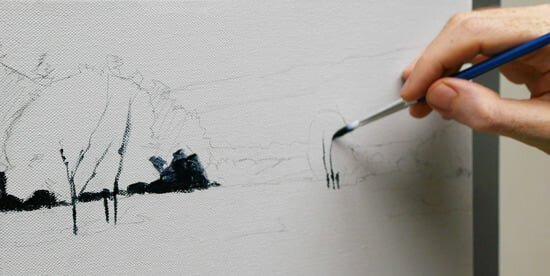
When painting in the darks of the tree trunks, start from the bottom and then taper up your brushstroke from the bottom upwardly. As the brush strokes reach the top lift off the pressure level to create a feathered edge.
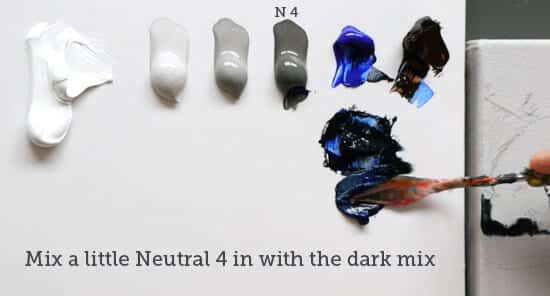
And so mix in a little Neutral iv with the commencement dark mix so it slightly lifts the tonal value. Don't add too much of the N4 at this stage.
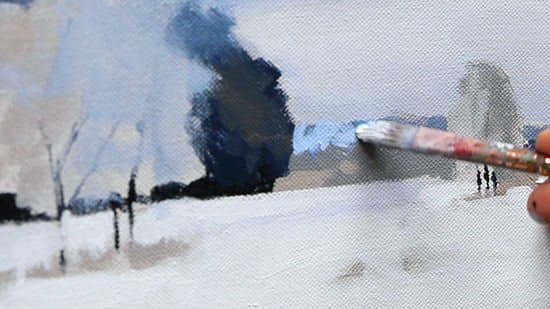
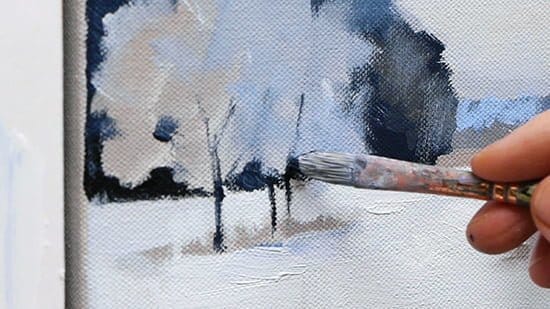
Step seven. – Blocking in tones with a filbert brush
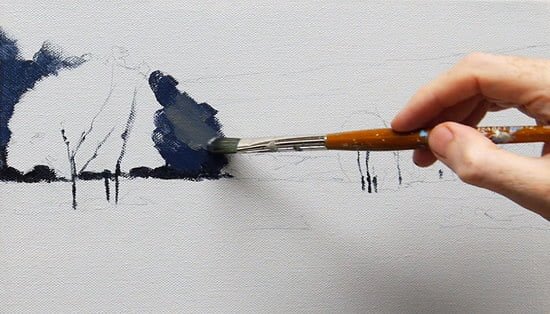
I at present swap to the Size 6 Filbert Isabey Isacryl brush and paint on a slightly lighter blueish mix on top of the dark tree shape, I'm working in wider blocks of colour with gestural marks.
Now take hold of a footling of the Neutral 6 (N6) and add a bear upon of the pure Ultramarine blue.
Paint this mix onto the far horizon line, I and then change the darkness of the mix to paint in variations of darker shapes on the far right side. You lot can already start to see the shapes of the copse emerging and the residual between the absurd blue and the neutral grey ground colour.
Working with the N6 & N8 I pigment in the central tree, still working with the size 6 filbert brush.
Step 8. – Calculation warmth with Burnt Umber
We can at present introduce some warmer colours to the composition by mixing some Burnt umber with Neutral 6.
I pigment this on the left-hand side of the tree and then use the same color to pigment the shadow tone under the tree
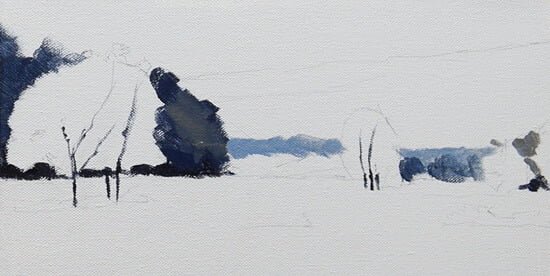
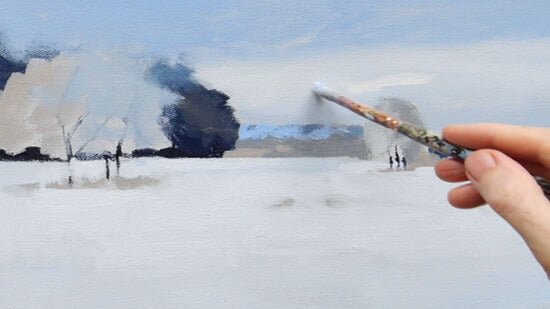
Pace 9. – Mix muted blues for the sky
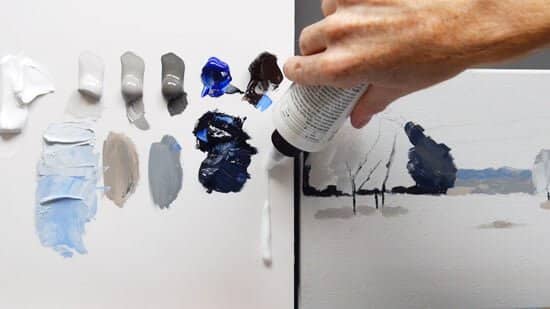
In training for the sky, I mix a colour string of two muted low-cal blue colours. The colour is a mix of Titanium white, Neutral 6 and Ultramarine bluish. I also add some Acrylic Glazing Liquid (gloss) to the palette.
Swapping to the larger size ten Isabey Isacryl filbert, I paint on the darkest of the two blue mixes to the peak of the painting. The application is quite thin every bit I desire some of the Neutral ground colour to show through to 'warm' the sky from backside.
So paint on the lighter blue mix to the bottom half of the heaven. When the top and bottom of the sky are nevertheless wet add a bear on of Acrylic Glazing Liquid to the end of the brush and gently work over the join betwixt the ii colours so they softly blend together.
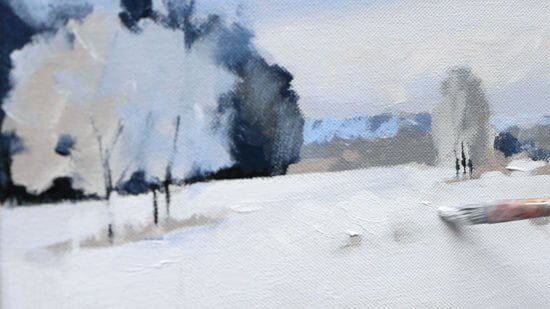
Nevertheless using the size ten filbert, I pigment a few more gestural strokes onto the tree edge. Loosening upwardly your landscape paintings with gesture to capture the rhythm of the subject field, bold brushwork and having a broken border can give an illusion of branches from a distance, then go on it scratchy.
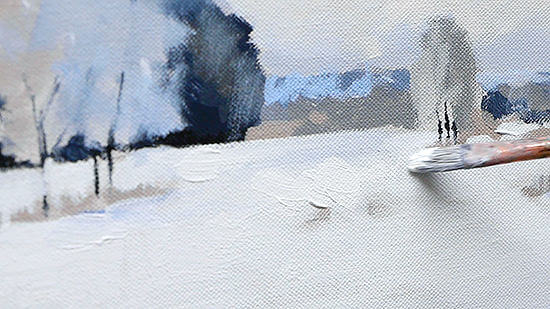
Step 10. – Mix muted white for the snow
I now mix another colour cord with the Titanium white, N8 and a tiny amount of Ultramarine blue. And so apply the darker of the 'white mixes' to the bottom of the canvas.
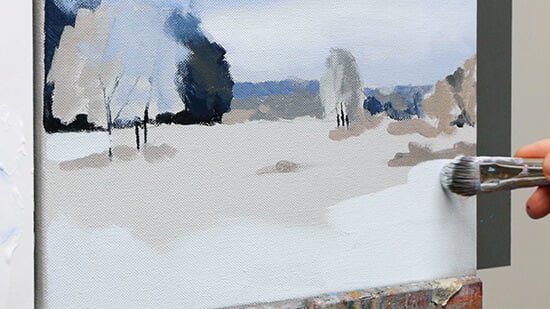
Paint the darker tone in a semi-circle at the bottom of the canvas.
Then add the lighter mix to the rest of the canvas working quite quickly with the brushstrokes.
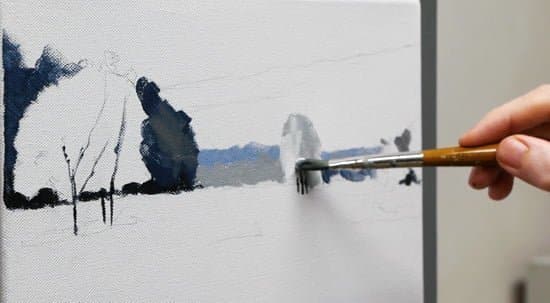
Pace 11. – Add together texture with a bristle castor
I at present swap to the size 4 Blackness sus scrofa hair castor. This is a stiffer bristle brush and will give more visible brushmarks and texture.
I then mix a cleaner, brighter blue for the mountains in the far altitude.
Step 12. – Add a subtle warm white to the sky
With a piddling Burnt umber and white I tin can warm up and lighter the area where the sunday is illuminating the clouds.
Step 13. – Refine the shapes and darks
Working around the edge of the tree on the left I tweak the shapes so they have a dainty balanced blueprint.
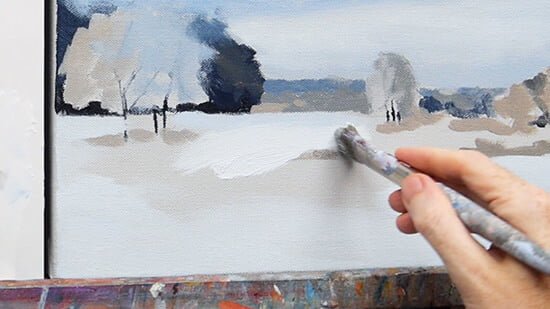
Step 14. – Add thicker white to the heart
Still using the bristle brush, build upwards a thicker impasto surface area of white in the centre of the painting to subtlety guide the viewers middle into the centre of the picture and maintain a loose, painterly quality.
I then reinforce the dark tree trunks using the side edge of the bristle castor.
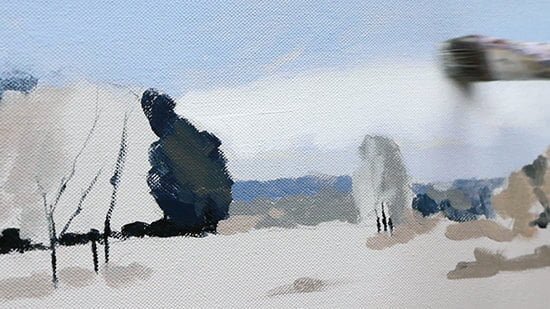
The final painting

You tin can watch the full video tutorial (30min) below. Enjoy!
Video Tutorial – Office 1
Video Tutorial – Part 2

Source: https://willkempartschool.com/how-to-paint-a-snowscene-in-acrylic/
Posted by: dancystook1969.blogspot.com
0 Response to "How To Paint Winter Scenes Acrylic"
Post a Comment