

how to cleaning ip3500 canon printer head
Performing Nozzle Test and Head Cleanings - Mac Os X
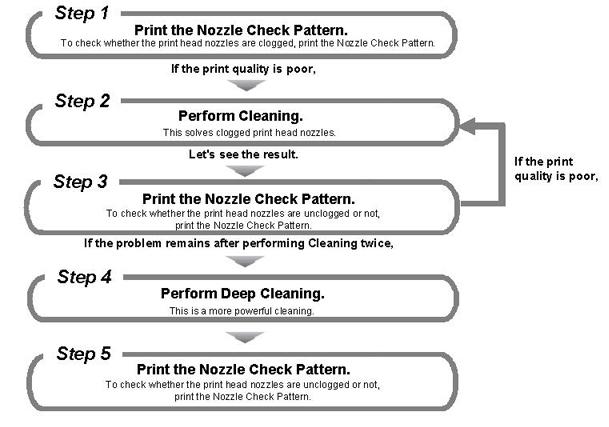
If the prints are faint or streaks are printed, the print caput nozzles may be chock-full. Those phenomena can be improved by performing print head cleaning or print head deep cleaning. Also, you tin can cheque the cleaning results by printing the Nozzle Bank check Pattern after cleaning.
Note: After confirming that the interface cable connects the printer to the reckoner and the printer is turned ON, please perform the following. Ostend that a print job is not in progress, then launch the IJ Printer Utility.
Note: In Nozzle Cheque Pattern printing after print caput deep cleaning, if missing lines in the pattern are not improved, the ink cartridges may exist defective.
1. Launch the IJ Printer Utility.
Note: In versions of Mac Os Ten older than 10.4, open the IJ / BJ Printer Utility from the Library>Printers>Catechism>BJPrinter>Utilities folder.
- In the Apple tree menu select Organisation Preferences
- Open Print & Fax.
- Make certain the correct printer is selected and, depending on OS version, click 'Open Impress Queue...' or 'Print Queue...'.
- Click the Utility icon.
- Select the printer, then click 'Maintenance'.
2. From the popular-up menu, select 'Exam Print'.
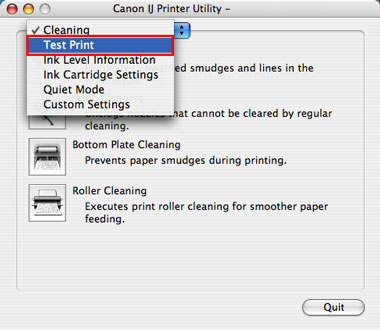
3. Click the 'Nozzle Check' icon.

The layout of the Maintenance sheet varies depending on the printer you are using.
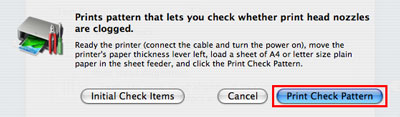
4. Later on Checking that A4 or letter of the alphabet size obviously paper is set in the car sheet feeder, click 'Print Check Pattern'.
Note: When Initial Check Items is clicked, the confirmation items before performing nozzle bank check pattern printing will be displayed.
5. Nozzle check pattern printing will start.
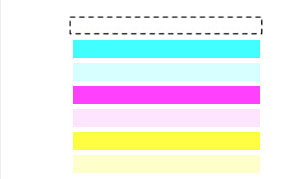
six. Examine the nozzle check pattern output.
When the output is normal:
Black ink: The grid pattern is regular without missing lines.
Color ink: White streaks are not visible in the pattern.
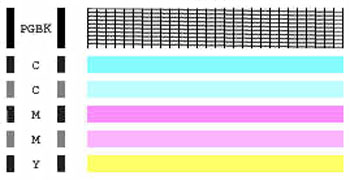
The pattern may vary depending on the printer.
When the output is not normal:
No colour is printed. (Nothing appears on the output.)
-
There is any color which is not printed at all. (In the sample beneath, black ink is not printed at all.)
-
There are missing lines partially in the pattern for the blackness ink.

-
There are white streaks in the color ink blueprint.

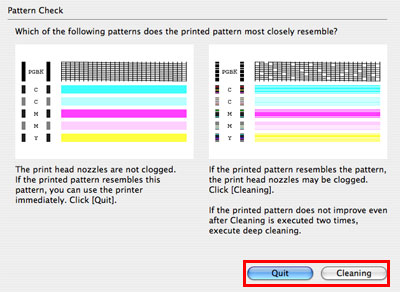
seven. Make up one's mind whether the Nozzle Check Pattern is normal or not, and perform the following:
When the output is normal:
Click 'Quit' to finish the pattern check.
When the output is non normal:
Click 'Cleaning' to perform print caput cleaning.
eight. Select the target ink for Cleaning, and then click 'OK'.
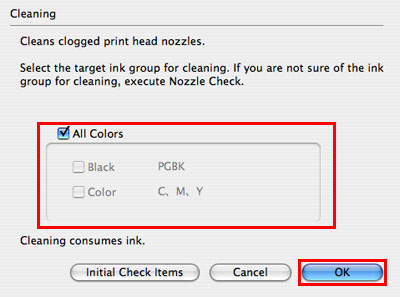
- When performing Cleaning for all colors, check 'All Colors'.
- When performing Cleaning for Black, deselect 'All Colors', and check 'Blackness'.
- When performing Cleaning for Color, deselect 'All Colors', and check 'Colour'.
Annotation: Print head cleaning consumes a certain amount of ink. Do impress caput cleaning just when necessary. When Initial Cheque Items is clicked, the confirmation items before performing print head cleaning will be displayed.

nine. Print caput cleaning starts.
The Power lamp will blink and print caput cleaning of the print head nozzles starts. The glimmer stops when print head cleaning is over. Until impress head cleaning completes, exercise not try other operations. Print caput cleaning will accept most 60 seconds.
10. Print the Nozzle Check Pattern to examine the print head condition.
Confirm that sheets of A4 or letter size manifestly paper are loaded in the auto sail feeder, and click 'Print Check Pattern'.
Annotation: When Initial Check Items is clicked, the confirmation items earlier performing nozzle cheque pattern printing volition be displayed.
11. Nozzle bank check pattern printing will first.
12. Examine the printed Nozzle Bank check Blueprint. (The test method is the aforementioned as the step 6 and 7.)
13. Perform print caput cleaning again. (Same every bit the steps nine to 12.)
Note: If the pattern is notwithstanding abnormal, perform print head deep cleaning. Print head deep cleaning consumes a larger corporeality of ink than normal cleaning. Perform print head deep cleaning just when necessary.
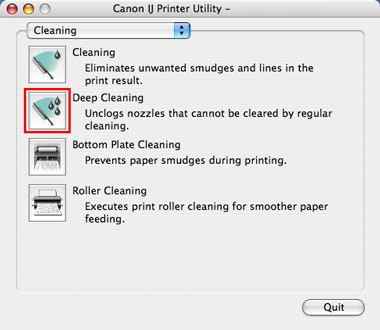
14. From the popular-upwards menu, select 'Cleaning'.
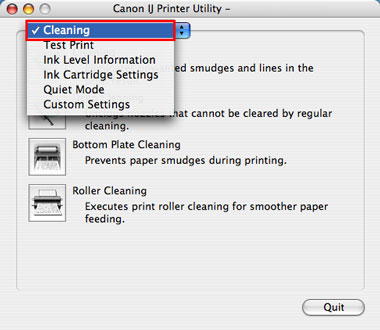
15. Click 'Deep Cleaning'.
16. Select the target ink for Cleaning, and then click 'OK'.
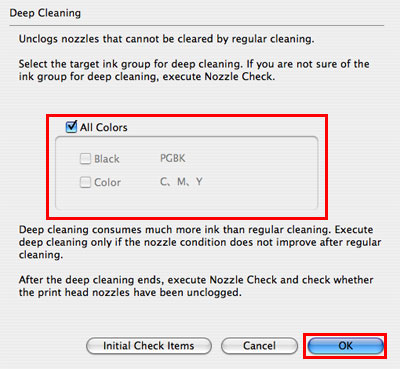
- When performing Cleaning for all colors, check 'All Colors'.
- When performing Cleaning for Black, deselect 'All Colors', and cheque 'Black'.
- When performing Cleaning for Color, deselect 'All Colors', and check 'Color'.
Note: When Initial Check Items is clicked, the confirmation items before performing nozzle check design printing volition be displayed.
17. Print head deep cleaning starts.
The Power lamp will blink and print caput cleaning of the impress head nozzles starts. The glimmer stops when print head cleaning is over. Until print head cleaning completes, do not try other operations. Print head cleaning will take virtually 2 to three minutes.
xviii. To bank check whether the clogged print caput nozzles were improved, print the Nozzle Check Pattern again.
19. If the printed blueprint is notwithstanding aberrant, finish the pattern cheque. The ink cartridge(due south) may be defective.
Annotation: Plow the printer off and letting it sit for 24 hours or more than, then exercise Deep Cleaning again. The expect time may permit dried ink in clogged print head nozzles to liquify, and resolve the trouble.

Source: https://support.usa.canon.com/kb/index?page=content&id=ART120230
Posted by: dancystook1969.blogspot.com
0 Response to "how to cleaning ip3500 canon printer head"
Post a Comment